Powered By Blogger

Sunday, September 26, 2010

Fall Landscape


I love this project for 2nd grade! We talk about perspective, fore, middle and background. The students start with painting the sky, we add white to the blue for a tint. Then the students mix the two compliment colors blue & orange to get a nice brown color for the stems. Once dry the students add details to the pumpkins to make them look round and some crows in the sky. We construct our scarecrow as a class and glue him to the paper. They turn out really successful! I saw this a few years ago on a school art webpage.

Saturday, September 11, 2010

Art Class


This is my artroom for the 2010-11 school year. I was very thankful to be able to keep my room this year. Our building is very packed due to full day kindergarten this year, rather than half day last year. I hope we can add on to the building soon or I will be on a cart for sure!

String Print


3rd graders make this neat-o print project. We talked about raised surfaces and additive printmaking, also the primary colors. The first part is gluing the string on. I usually have the kids do this towards the end of the first class, then the next time they come to class it's dry and ready to print. We talk about brayers since it's a new tool for the kids. Basically students choose 2 primary colors, roll on the paint, print and do again with the second color. Results are great!

Radial Symmetry 5th Grade


This is always a classic starter project for my fifth graders. A little challenge, a lot of thinking and super results for everyone! Variety in line and shape is a huge focus for this one. Each student starts with a 6x6 paper square and start a design in the bottom right corner, I tell this this will eventually be the middle of their paper. Once their design is finished they sharpie both sides of the paper because they will be flip-flopping it once they trace on the large 12x12 paper. Large paper is folded into 1/4's then unfolded, the student usually use a paper clip to clip the small square behind the first section, trace with sharpie, flip the design and trace in the second section...so on until their design in a complete shape. Students use smelly Mr. Sketch markers and the results are always awesome!

Value & Shading

I found this idea at Mr. E's blog...great stuff over there! My only problem with the project was it way way too time consuming. This took us 4 weeks! Next year if I do it I will try a smaller size like 8x8. A great way to show deminsion in work and get the message across about value. I think everyone will be ready to move on to something new next week! Thanks again Mr. E!

Clowns


I found this project on Art Projects for Kids blog...a great source with excellent guides! We talked about all the places we would see a clown, what makes a clown look like a clown and if there are any famous clowns they know of. One boy said Crusty the Clown, I guess he already watches The Simpsons. Kind of funny hearing all of the answers! We drew the clown together on black paper and made sure we used solid color with our oil pastels. I thought a little border at the top and bottom would look circus-like. I love the one with arms, very creative!

Cityscapes

This was a 2nd grade project. I usually use this as my starter project for 2nd grade. We review our lines and shapes and talk a lot about detail. We also look at some of City, Land & Sea "scape" pictures comparing and contrasting. The students draw with a pencil, outline in sharpie and color in. I love looking at all the different details each student uses.

Primary Color Cities


Here is a project I did with Kindergarten. It was the first big project we did since it took us a couple weeks to practice cutting, gluing and all those fun things I forget Kindergarten students need practice with every year. The first thing I had the students do was use white paint to splatter on black paper to create a night effect. I got this idea from another blogger but can't remember which one. I changed up the city part to primary colors though. A good starter project for Kindergarten. A little messy and more cutting/gluing practice with the buildings. This project took 90 minutes. The first 30 to do the splatter, then the next whole class period for the buildings.

Thursday, September 9, 2010

American Gothic House Visit


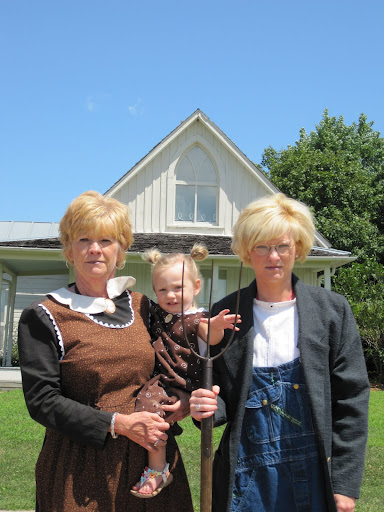
This was taken the day my mom, daughter and I went to visit the American Gothic house in Eldon, IA! It was well worth the visit to the house!

American Gothic House Visit July 2010


Just a tiny little farm house in Eldon, IA

July '10


Here are some of the tiles that were on the inside of the door of the museum at the American Gothic house.

July '10


My mom, daughter Kyla and I. We did a smile face and a serious one! The people at the museum were very friendly to help dress us up in the classic outfits worn in the painting.

July '10


Our serious pose.

July '10


This was the what you saw when we entered the musuem. The real American Gothic is at the Chicago Art Museum.

July '10


Another parody in the museum.

July '10

July '10

July '10

July '10

July '10

MagicHouseEasterArtProjects Mar'10


Here are some 5th grade student parodies base on the American Gothic

MagicHouseEasterArtProjects Mar'10

MagicHouseEasterArtProjects Mar'10

5th grade Coil Pots

Clay is always so much fun for the kids. Each student got a large clump of clay and did lots of rolling and building upward to get a coil pot. We played around with some of the glazes too!

MagicHouseEasterArtProjects Mar'10

Japanese Blow Paintings

Students used liquid black watercolor and little straws to get this neat effect. I had them use q-tips to add the cherry blossoms. I mixed red and hot pink paint for the blossom color. First graders loved this one!

March '10


Cherry blossom blow painting